***MY BLOG HAS MOVED TO WWW.FINDINGWENDE.COM***
DIY Midori Style Travelers Notebook
I discovered Midori Travelers Notebooks while watching Jennifer Ross on Youtube about a week ago and I must say I'm in LOVE!!!
I did NOT want to drop the big bucks for one though, so I decided to make my own! It wasn't too hard and I will show you how!
First off, you will need a few supplies. I purchased everything at Hobby Lobby, but Michaels also carries most of this stuff too.
nail file, hammer, hole punch (this one is for eyelets, but there were ones in the leather dept. too), lighter, elastic cord, scissors, rivets (near the leather in HL), rotary cutter, ruler, and leather. I purchased a 3lb bag of leather remnants at HL.
First, I straightened two of the raw edges. Since these are remnants, they are leftovers from other manufacture's projects and are odd shapes.
For a cover that fits Field Notes notebooks, I cut a piece that is 8"x6". This is a little bigger than the Midori brand small one.
And then I rounded the corners. I used a marker lid to mark it and then cut with my sharp scissors.
Then I punched the holes. For the center hole, I folded it in half long ways and marked it at 4". This will be for the elastic that wraps around the whole book to keep it shut.
To punch that one, I scrunched the leather up to fit into my pliers. There's probably a better way to do this, but it worked!
Then I punched 3 holes on each edge. One in the center and then one on either side of that one about 1/4" away.
I used this elastic string from Hobby Lobby. It was near the jewelry cording. It's 2mm and black.
OK! Stringing this is not hard, but there's a certain order to go.....
1. inside to outside in the center top. Pull a good amount thru. You can go back and adjust it later so you don't waste much. Then outside to inside to the hole on the right.
Then go down to the bottom right hole and go inside to outside.
Go from outside to inside thru the center bottom hole.
Then go inside to outside thru the top center hole and back in the left top hole.
and.....back down to the bottom left hole and go to thru to the outside.
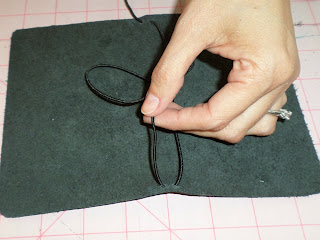
and lastly, pull it thru the center bottom hole again. You can adjust it now so that you don't have a really long tail in the middle. Cut the elastic cord off the roll and tie a square knot. (right over left. left over right. ) Be sure to pull the strings a little tight to where the cover does bend up a little. This will make sure they are holding the booklets in tight.
Use a lighter and burn the edges of the cording and that will prevent it from fraying.
Next, you will measure for the closing loop. Make it just a little smaller than the width of the cover and tie a knot. Pull it thru from the inside out thru the center hole.
To make a pen loop you will need a small scrap of leather. Measure around your pen and cut to fit with enough to attach it to the cover. (this photo is upside down, sorry!)
Punch a hole thru both sides of the loop and one thru the cover. Adjust where you would like your pen loop based on the length of your pen.
You will use a rivet to attach it. They are super easy to use and I found a huge pack near the leather dept. at Hobby Lobby. There are two pieces to these. One with a long post and a shorter button one.
Push the long post thru the cover and both sides of the pen loop from the outside to inside. Put the button side on the rivet and snap it down. Give it a good whack with a hammer. It only takes one or two hits and I used a scrap of leather to cover the rivet so it wouldn't scratch. Test it and make sure it's secure.
And that's it!!! Loop your booklets by pulling it thru one of the elastics and centering it in your booklet. I have two booklets in mine, so I used two elastics on each book. You can add up to four booklets to this one!
Here's what the loops look like on the outside spine.
And you're done!!! If there's rough edges, you can file them off with a nail file! :)
Hope you enjoyed this tutorial! Keep checking back for a tutorial on the booklet inserts too! Coming soon so subscribe!!!
Thanks for reading!!!
Wende


No comments:
Post a Comment